Nevertheless, not everybody wants to use OneDrive. Some people prefer to use other cloud services (like Dropbox, iCloud and Google Drive) and some others just don’t want to use any cloud service at all. These people often want to disable or remove OneDrive completely from their computer. In this article, we will see how to hide, disable and uninstall OneDrive from a Windows 10 machine. OneDrive has been available in Windows 7 and Windows 8 as well. But in Windows 10, OneDrive is tightly built into the system. In Windows 10, File Explorer shows you a separate icon for OneDrive and you can not uninstall it from Control Panel.
Disable OneDrive in Windows 10 Professional, Enterprise and Education Editions
First lets understand what would disabling OneDrive mean. If you disable it, OneDrive would not connect with any apps and it would not sync with the cloud. Also, OneDrive icon in File Explorer would be gone. If your computer is being used by other people as well, they all will lose access to OneDrive because disabling is done at the Group Policy level; which affects all the user accounts on the computer. Now lets see how to disable OneDrive:
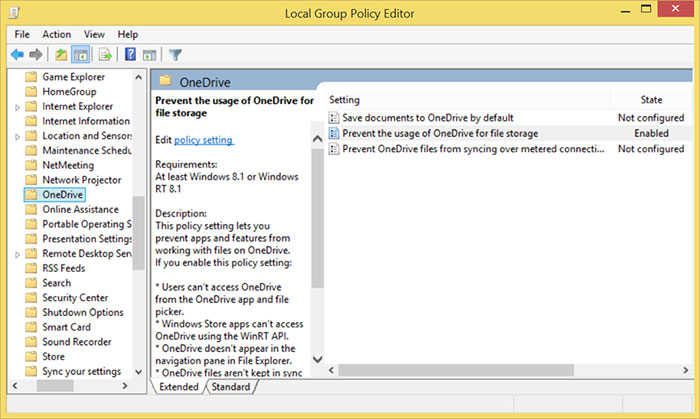
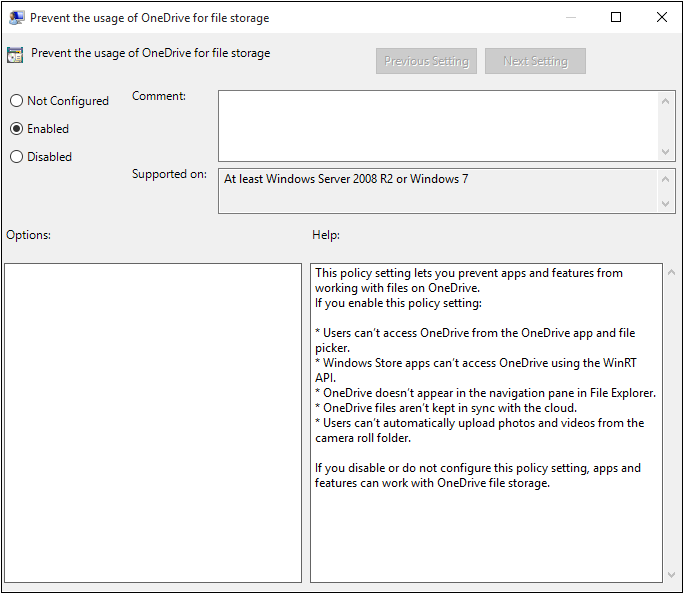
Press Windows key + R to open Run box Type gpedit.msc in the Run box and hit enter. Please note that gpedit.msc is not available in Windows 10 Home edition. Users of Windows 10 Home edition will need to use an alternative method of disabling OneDrive (we will explain that too) gpedit.msc command will open Local Group Policy Editor Navigate to Local Computer Policy > Computer Configuration > Administrative Templates > Windows Components > OneDrive Under Prevent the usage of OneDrive for file storage select the Enabled radio button Click OK to close
That’s all. Above steps will completely disable OneDrive in your computer. Now you will not see the OneDrive icon in File Explorer.
How to get back OneDrive?
If you change your mind, you can always get OneDrive back by again going to Local Group Policy Editor and disable the option Prevent the usage of OneDrive for file storage. This will enable OneDrive and bring it back to life.
Disable OneDrive in Windows 10 Home Edition
Windows 10 Home Edition does not come with Local Group Policy Editor. So, you would need to tweak Windows Registry a bit in order to disable OneDrive in you computer.
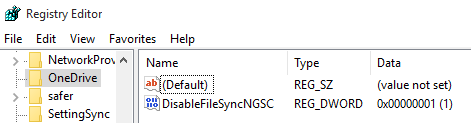
Press Windows key + R to open Run box Type regedit.exe in Run box and hit enter. This will open Registry Editor Navigate to HKEY_LOCAL_MACHINE\Software\Policies\Microsoft\Windows Right click on Windows and select New > Key Name the new Key as OneDrive (if a key with this name already exists, let it be. Don’t create a new key and use the existing OneDrive key) Right click on the (newly created) OneDrive key and select New -> DWORD (32-bit) Value. Name the new value as DisableFileSyncNGSC Set the data for DisableFileSyncNGSC registry value as 1. That’s it. Close Registry Editor Restart your computer to bring these changes in effect.
When your computer will come back to life, you will not see OneDrive icon in File Explorer.
Remove and Uninstall OneDrive from Windows 10
The above mentioned tweaks only disable OneDrive. But if you want to completely remove OneDrive from your computer, you can do so by using the built-in uninstall facility of Windows (you can not uninstall it from Control Panel). However, uninstalling OneDrive is not recommended because of the following reasons:
Disabling OneDrive (as explained above) should be enough for most people because it removes the icon and stops syncing of data with cloud. We can uninstall OneDrive but, should you change your mind, there is no way to bring it back (unless you reinstall Windows 10 or reset it to factory settings). Even if you uninstall it, future updates of Windows 10 may bring OneDrive back.
But still, if you want to uninstall OneDrive, you should take the following steps: Type the following command and press Enter key: Now, if you are using 64-bit Windows, type the following command and press Enter: But if you’re using 32-bit Windows, type the following command and hit Enter key: This is all. OneDrive has now been completely removed from your computer. Now if you will search for OneDrive app, you will not find it. Cleaning up after the Uninstall After uninstalling OneDrive, you may do a cleanup operation to remove remaining bits of OneDrive. Run the following commands in the Command Prompt: These commands will remove various OneDrive related folders from Windows. To wind it up all, run the following commands to remove OneDrive related registry keys that are no longer required. We hope that this tutorial on disable or remove OneDrive from Windows 10 computer was helpful for you. For comments, questions and suggestions, please use the comments section below. Thank you for using TechWelkin! Thanks JP “Right click on the (newly created) OneDrive key and select New -> DWORD (32-bit)” Does this work with a Windows 10 Home 64 bit edition or is there a different instruction for that system? Thank you in advance! Cheers. -Wes Comment * Name * Email * Website
Δ